Your First Program
What you'll learn
- Configure a drivetrain in VEXcode
- Write a program that drives straight
- Make the robot turn
- Download and run your program on the robot
Time to Make Your Robot Move
This is the moment everything comes together. You have the hardware, the software is installed, and now it is time to write actual code that makes your robot do something. By the end of this page, your robot will drive forward, turn, and follow your commands — all on its own.
Let us get started.
Step 1: Configure Your Drivetrain
Before you can tell your robot to “drive forward,” VEXcode needs to know what your drivetrain looks like. Which motors are the left and right drive motors? How big are the wheels? How wide is the robot? This information lets VEXcode calculate things like “12 inches” in terms of motor rotations.
Setting It Up in VEXcode
-
Connect your Brain to VEXcode
-
Click the Devices icon in the toolbar (it looks like a robot brain with a plus sign)
-
Click Add a device
-
Select Drivetrain — then choose 2-motor drivetrain (this is the most common setup)
-
Configure the following:
- Left motor port: The port your left drive motor is plugged into (e.g., Port 1)
- Right motor port: The port your right drive motor is plugged into (e.g., Port 6)
- Wheel type: Select the wheel you are using (e.g., 200mm or the standard IQ wheel)
- Wheel size: The diameter of your drive wheels
- Track width: The distance between the center of your left and right wheels
- Motor direction: Make sure both motors are set so “forward” actually drives the robot forward
-
Click Done
Getting the wheel size and track width right is important. If the wheel size is wrong, your “drive 12 inches” command might actually drive 10 inches or 14 inches. If the track width is wrong, your turns will be off. Measure these with a ruler — do not guess.
What This Looks Like in Code
When you configure the drivetrain through the Devices panel, VEXcode automatically generates setup code at the top of your Python file. It will look something like this:
Do not worry if those numbers look confusing right now. The important thing is that VEXcode generates this for you. The numbers represent wheel travel, track width, and wheelbase in millimeters.
Note: The True or False after the port number sets the motor direction. If your robot drives backward when you tell it to go forward, try flipping these values.
Step 2: Drive Forward
Let us write the simplest possible autonomous program — drive forward a set distance.
The Code
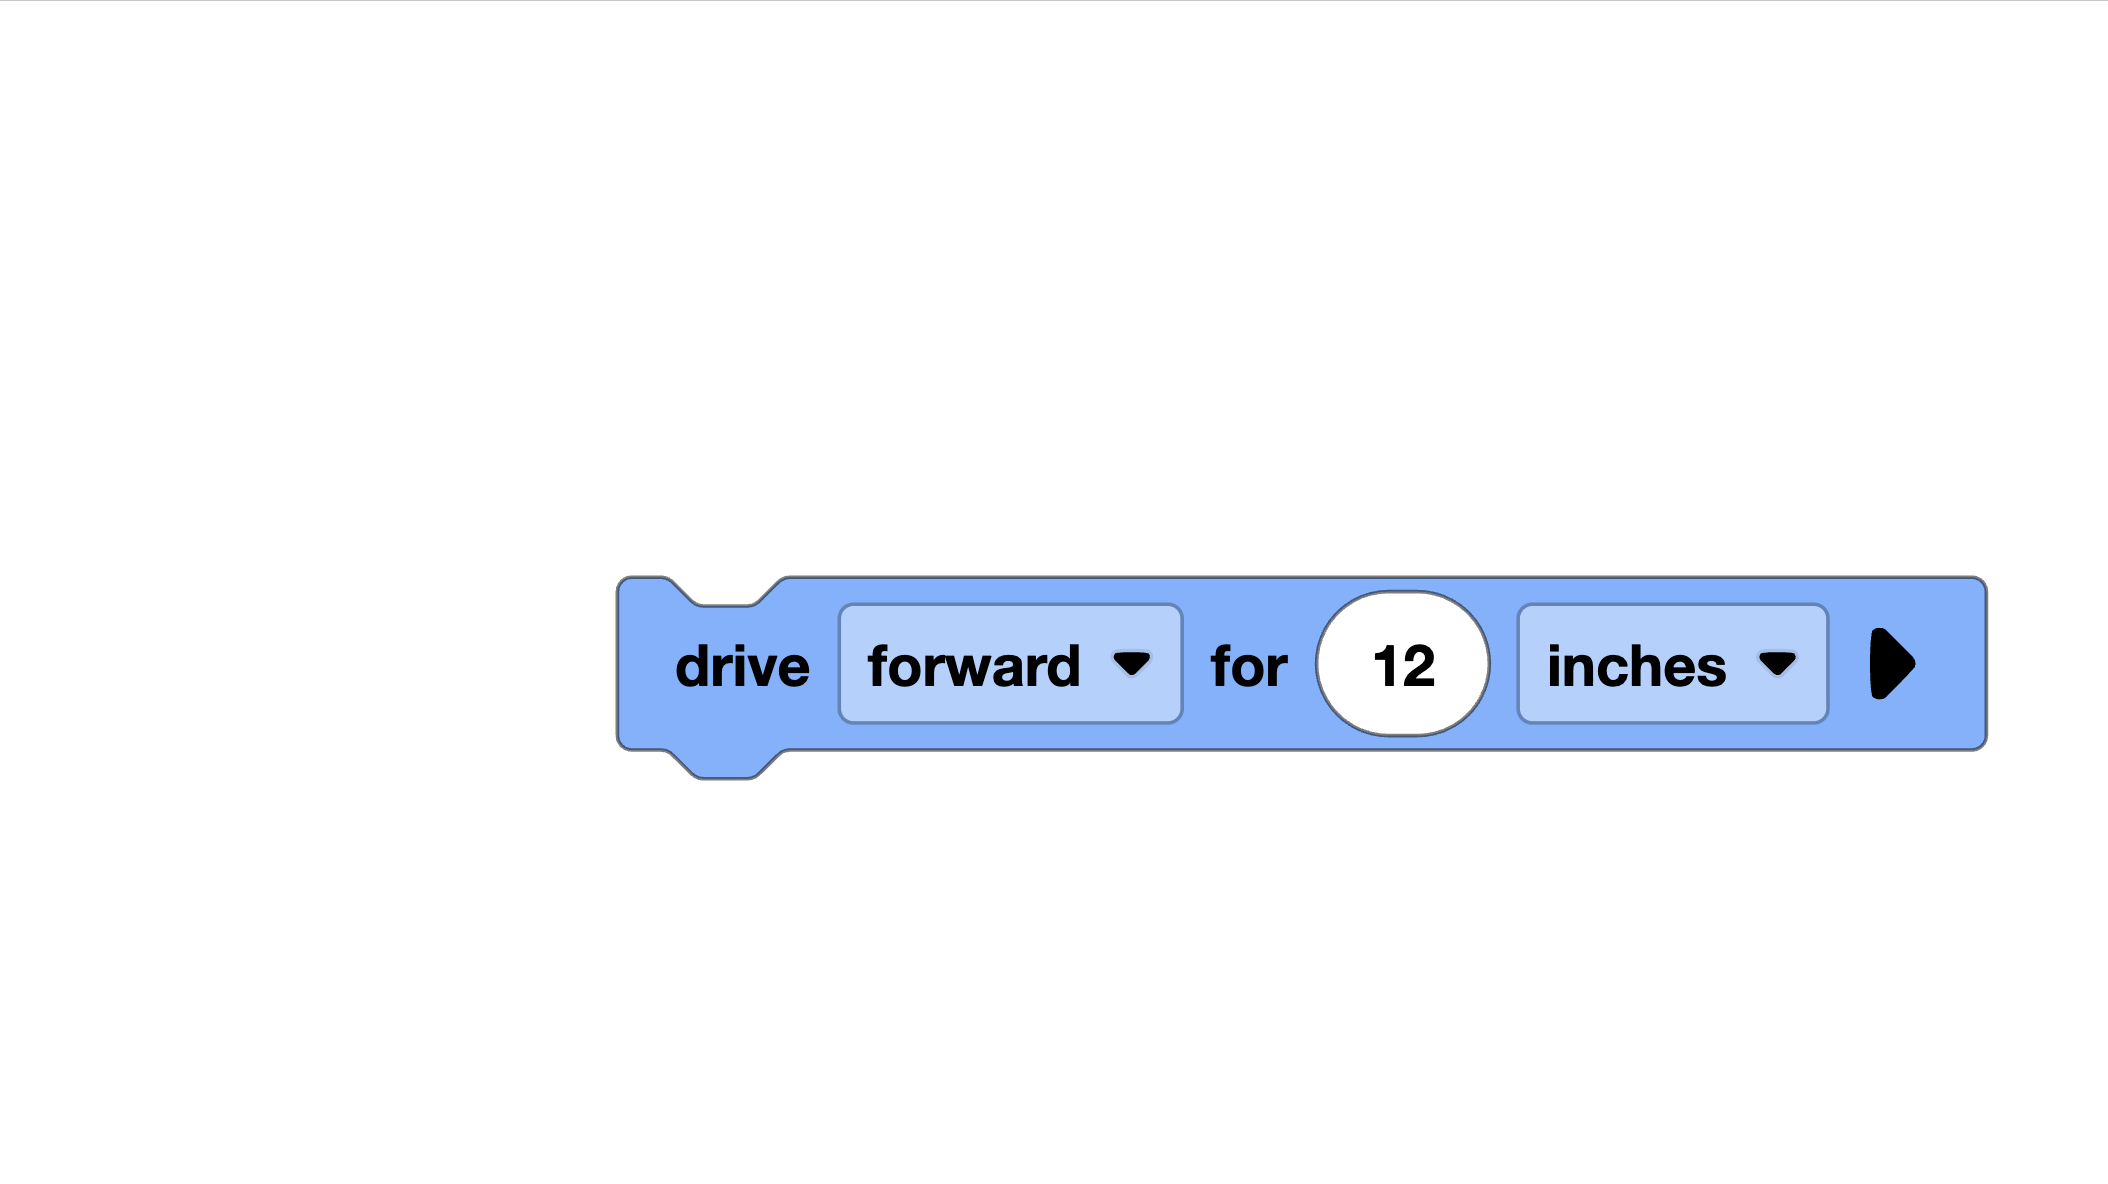
That is it. One line of actual autonomous code: drivetrain.drive_for(FORWARD, 12, INCHES).
Let us break it down:
drivetrain— the drivetrain object you configured.drive_for()— a function that drives a specific distance and then stopsFORWARD— the direction (could also beREVERSE)12— the distanceINCHES— the unit (could also beMMfor millimeters)
What Happens When This Runs
- The robot starts driving forward
- The motors’ built-in encoders track how far the wheels have rotated
- VEXcode converts that rotation into inches based on your wheel size
- When the robot has traveled 12 inches, it stops
Simple, reliable, and the foundation of every autonomous routine you will ever write.
Step 3: Add a Turn
Driving straight is great, but your robot needs to turn to navigate the field. Let us add a right turn after the forward drive.
The Code
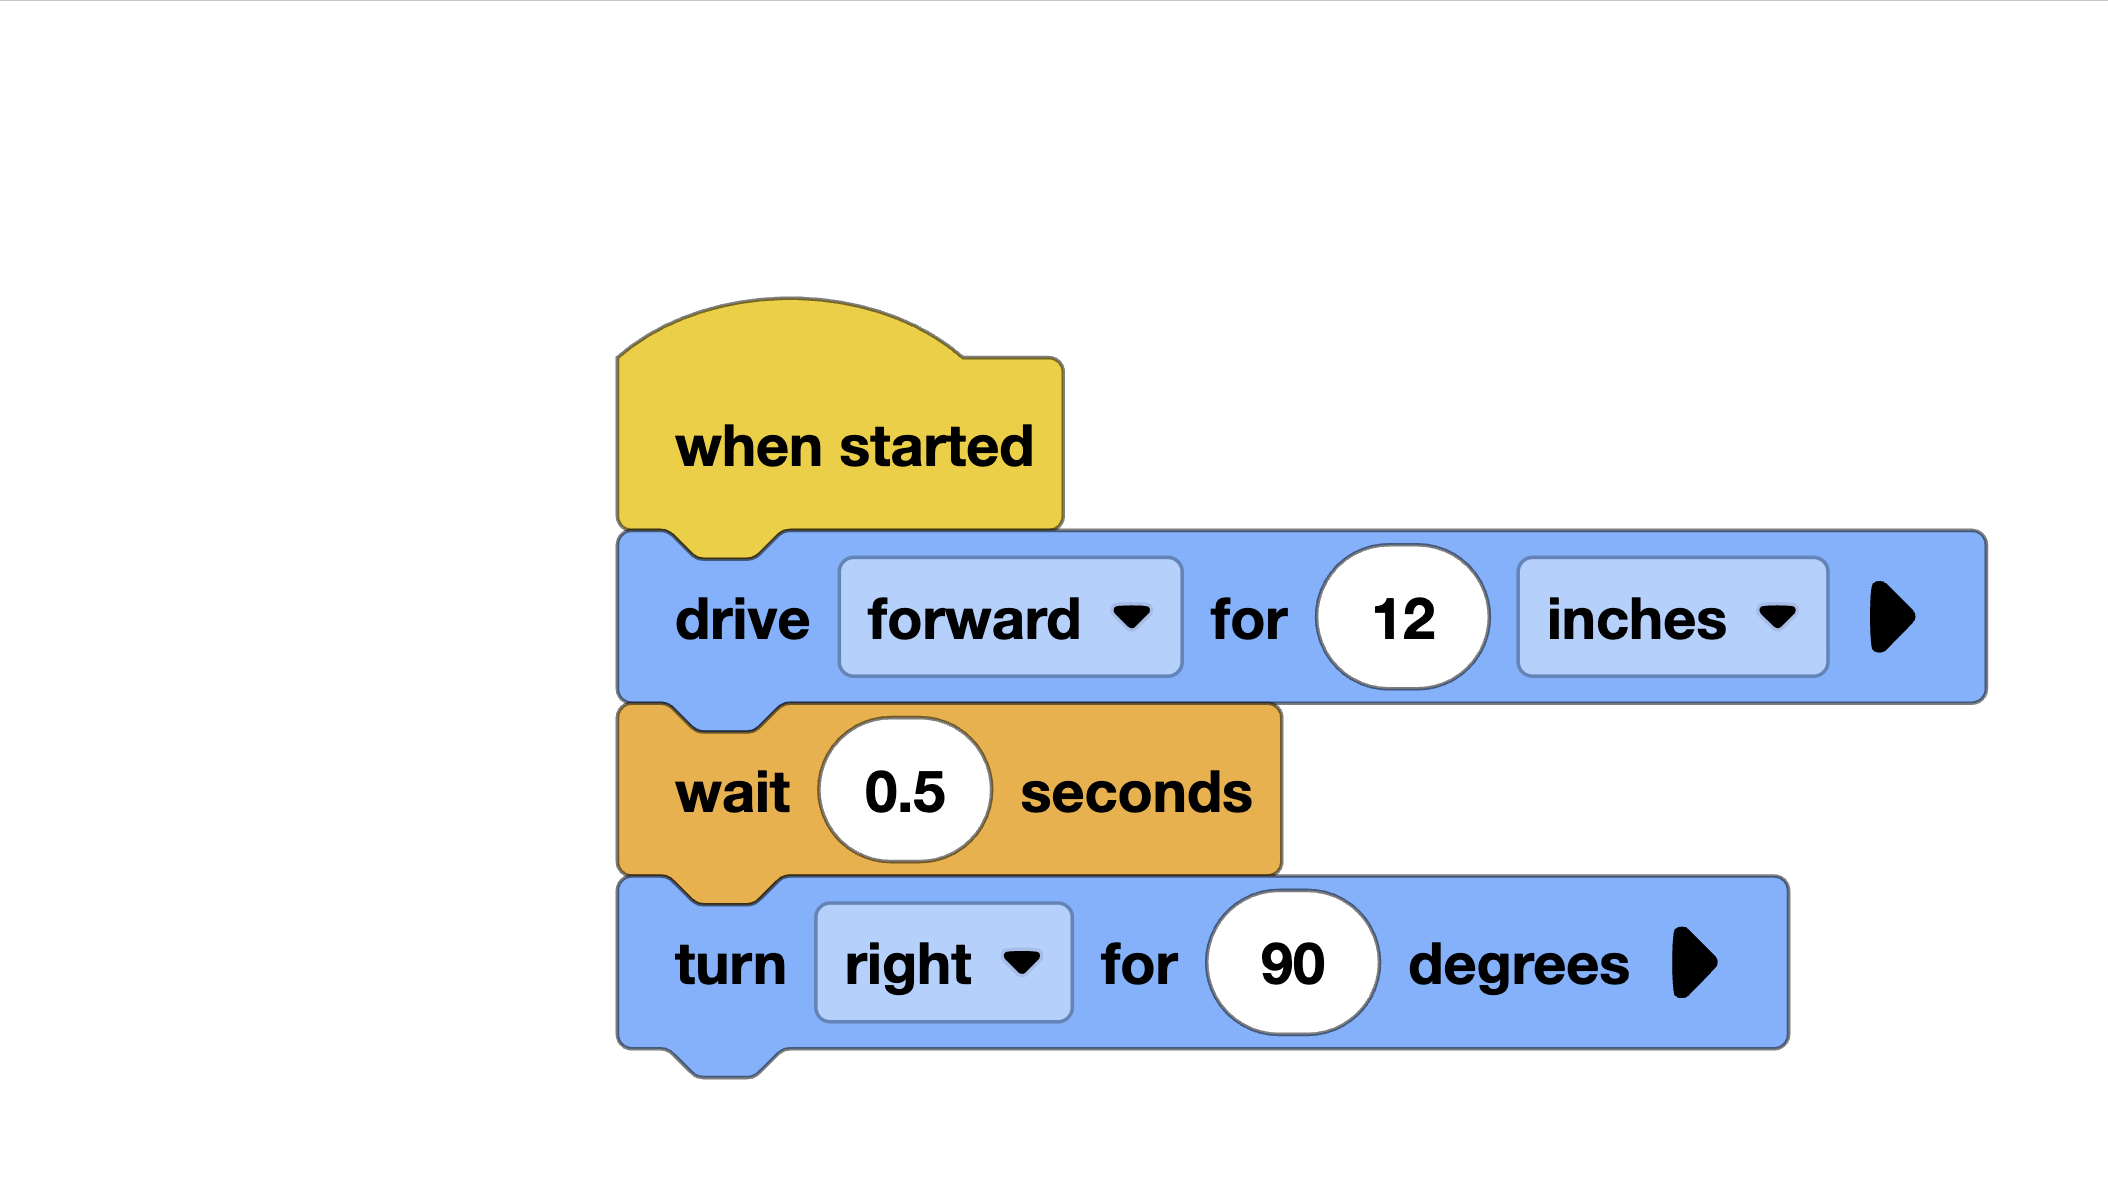
The new command is drivetrain.turn_for(RIGHT, 90, DEGREES):
RIGHT— the turn direction (could also beLEFT)90— the number of degrees to turnDEGREES— the unit
About That Wait Command
You might have noticed the wait(0.5, SECONDS) between the drive and the turn. This is optional, but we recommend it. When the robot stops driving and immediately starts turning, the momentum can throw off the turn accuracy. A brief pause of half a second lets the robot settle before starting the turn.
This is one of those small tricks you learn from competition experience. It does not seem like a big deal in practice, but during a match on a slippery field surface, it can make a real difference.
Step 4: Controlling Speed
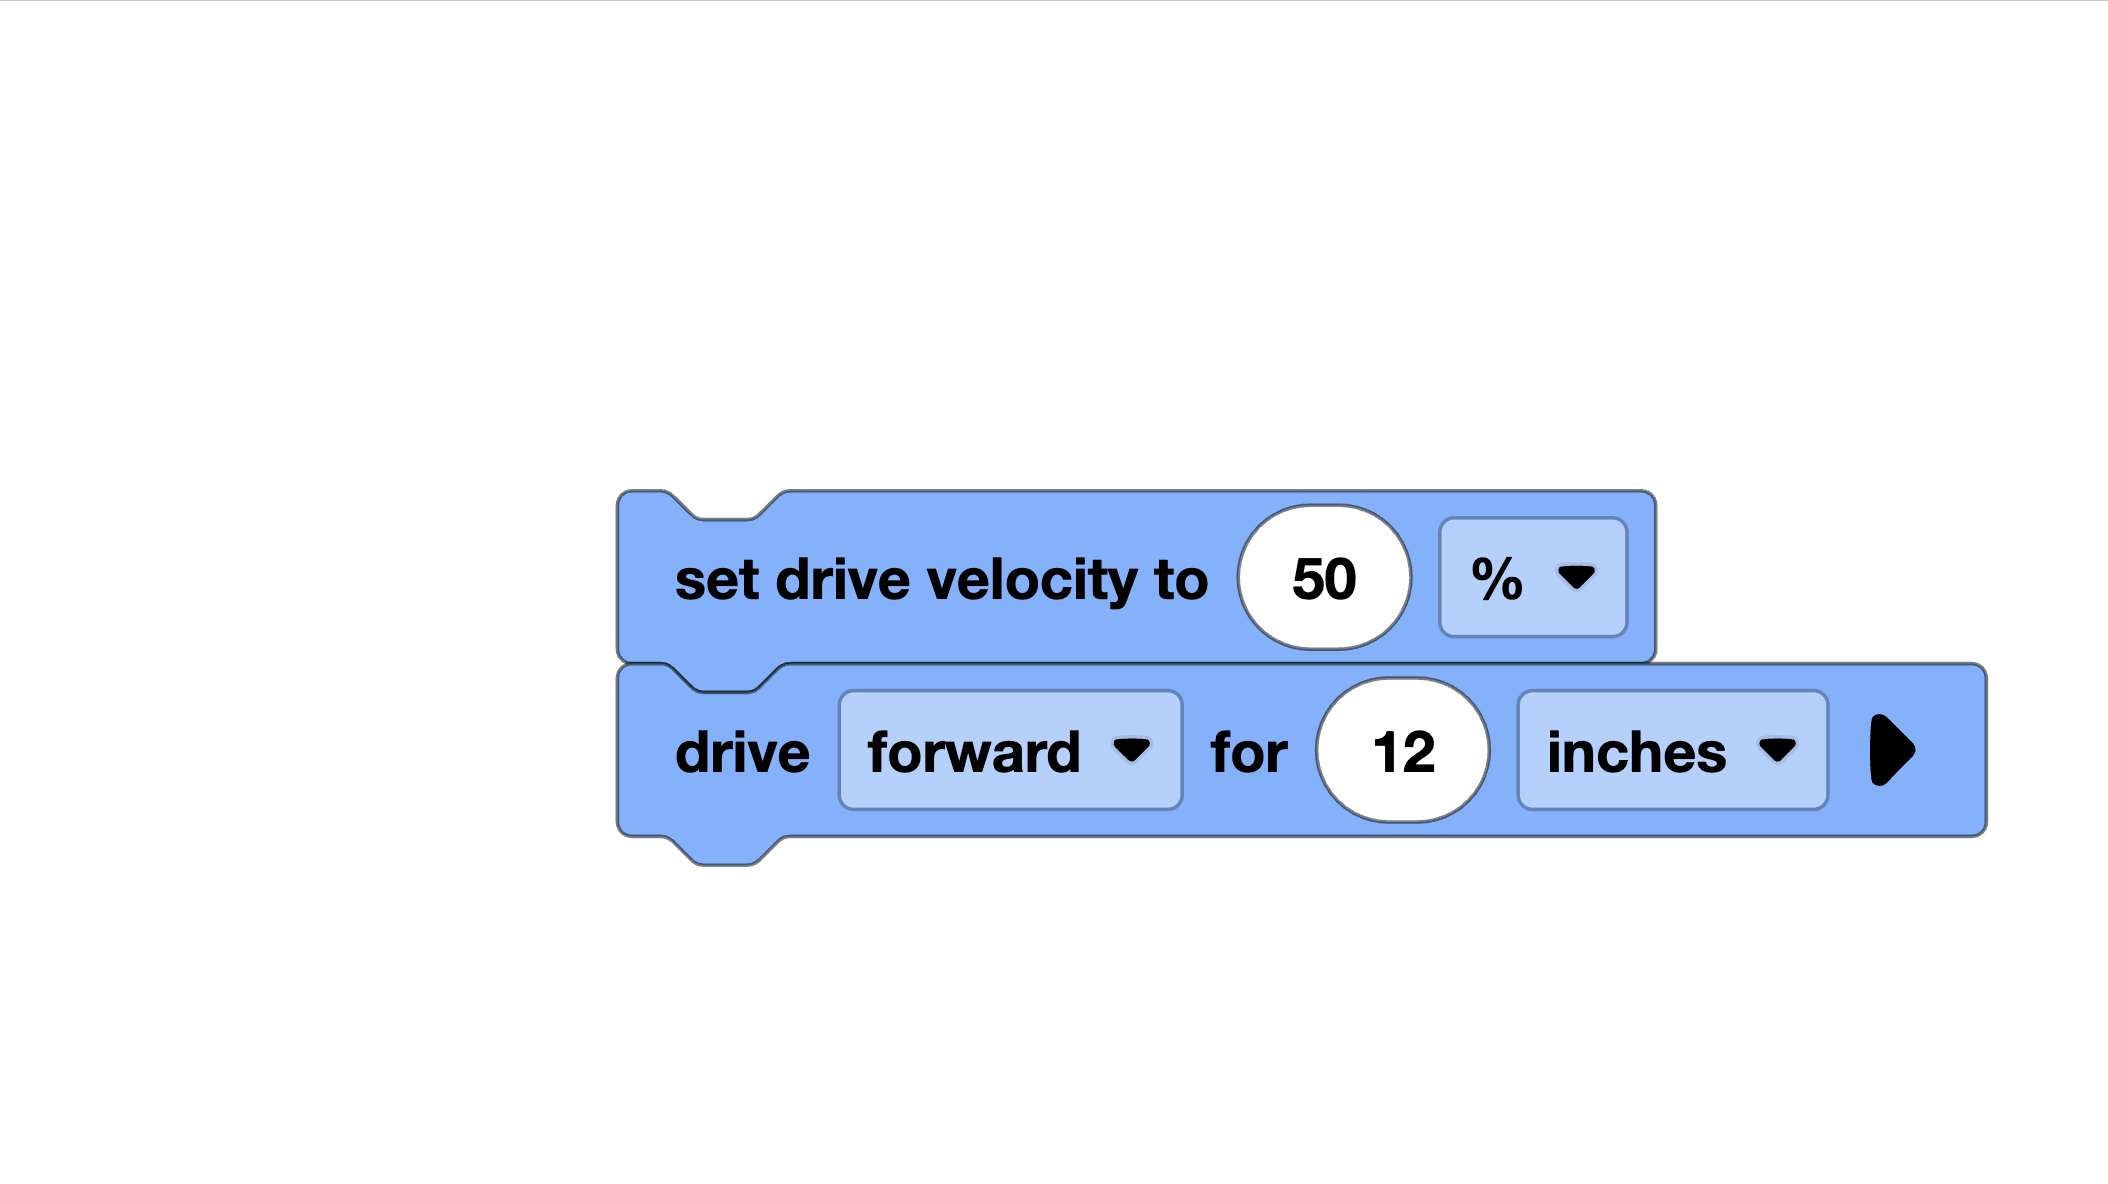
By default, the drivetrain drives and turns at a set speed. You can control this with the set_drive_velocity and set_turn_velocity commands:
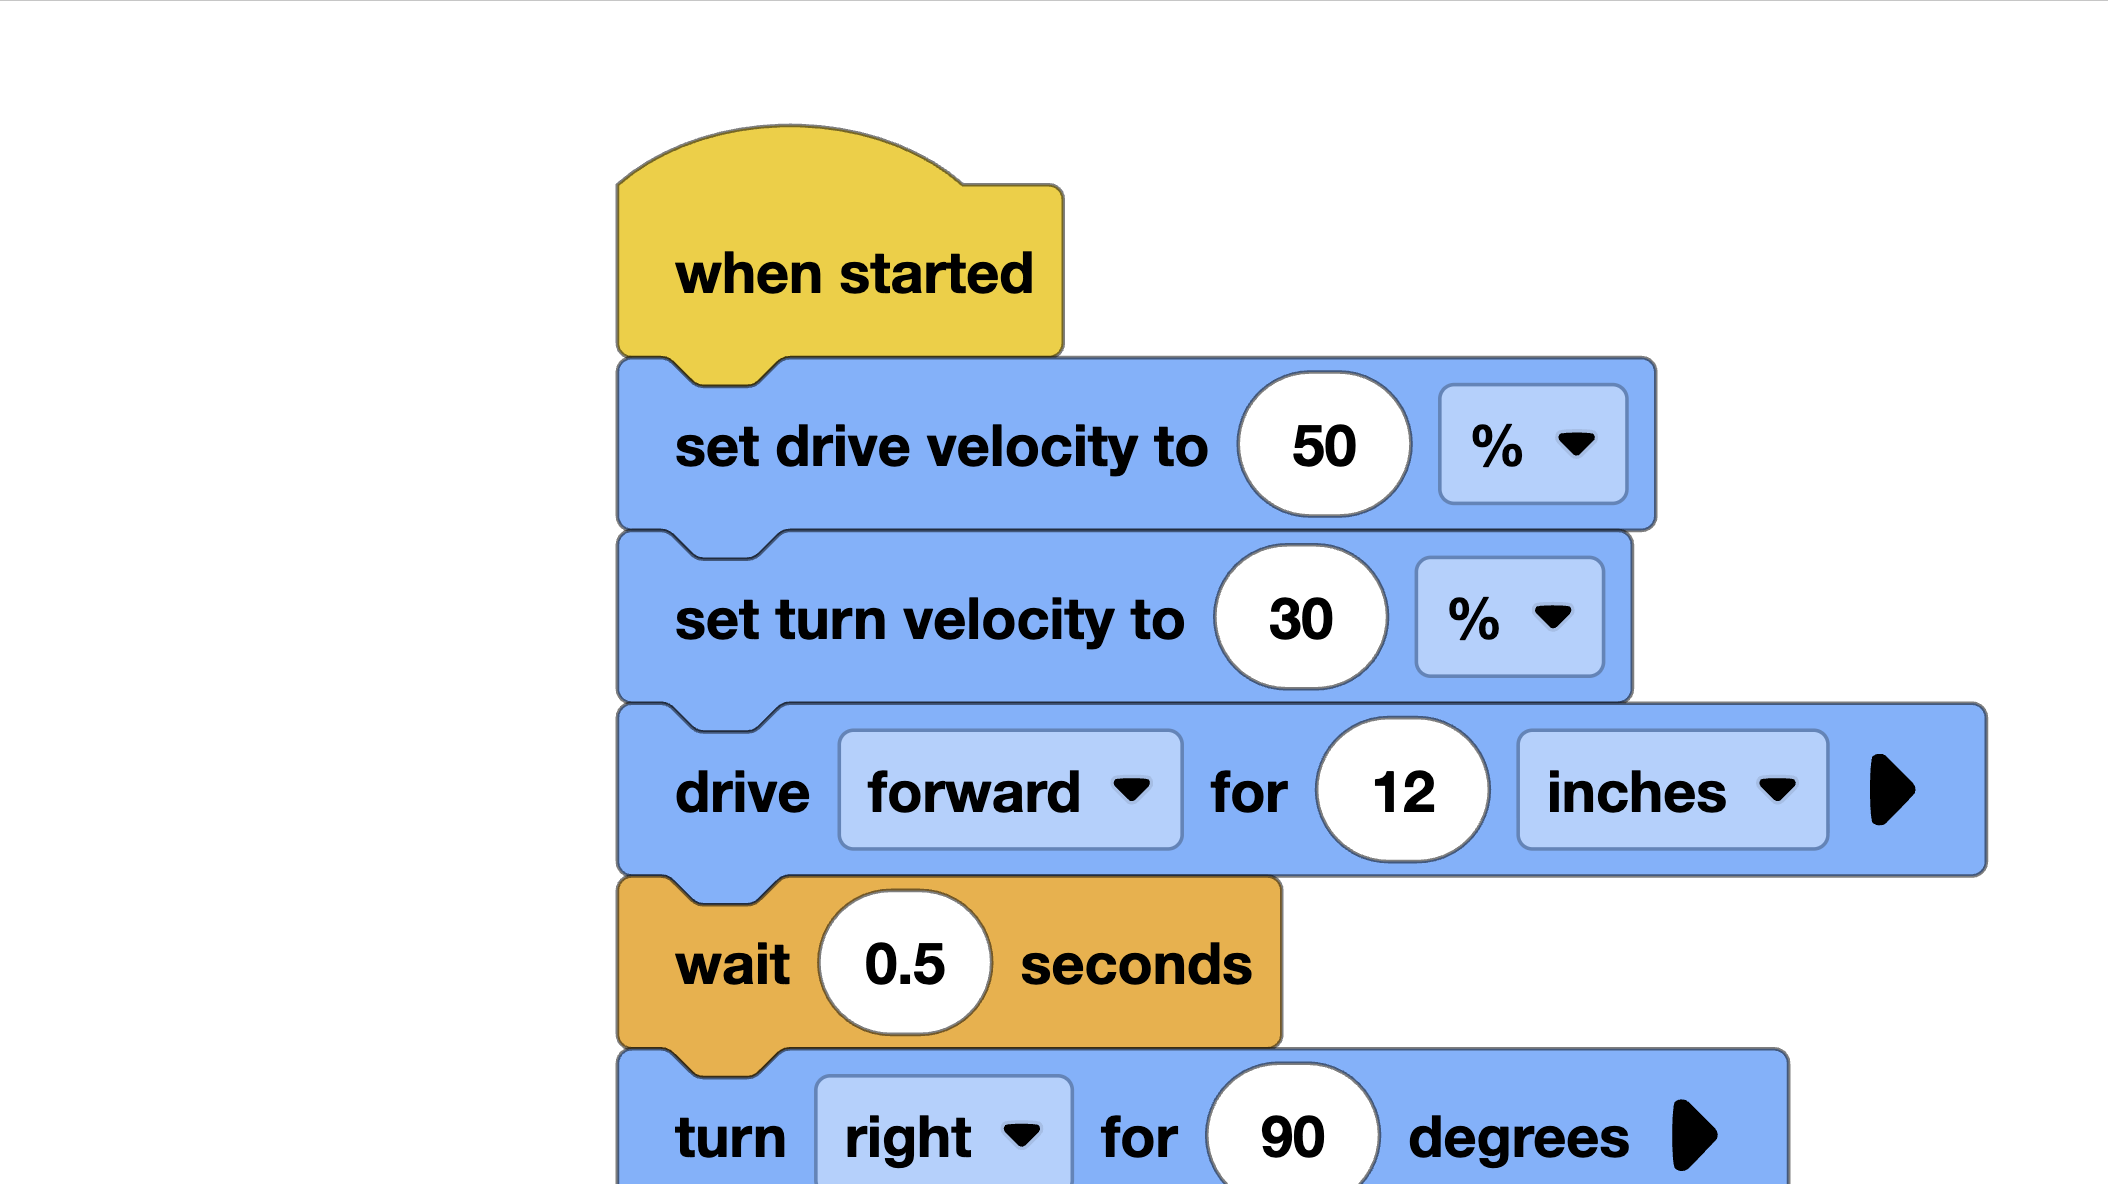
Why slow down? Slower speeds are more accurate. A robot turning at 30% speed will hit 90 degrees much more precisely than one spinning at 100%. For autonomous, accuracy beats speed almost every time. You only have a limited space on the field, and overshooting a turn by 5 degrees can mean missing a game piece entirely.
A good starting point is 50% drive speed and 30% turn speed. You can adjust from there based on testing.
Step 5: Download and Run
Your program is written. Now let us get it on the robot.
Downloading the Program
- Make sure your Brain is connected to VEXcode (via USB or Bluetooth)
- Click the Download button in the toolbar (the downward arrow icon)
- Wait for the download to complete — you will see a progress bar
- The Brain will beep when the download is finished
Running the Program
There are two ways to run your program:
From VEXcode:
- Click the Run button in the toolbar (the play icon)
- The program starts immediately on the robot
From the Brain:
- Unplug the USB cable
- On the Brain’s screen, navigate to your program
- Press the Run button on the Brain
- The program starts
For competition, you will always run from the Brain. But during testing, running from VEXcode is more convenient because you can quickly make changes and re-run.
Important: Place your robot on the ground before running the program. If your robot is sitting on a table and the wheels start spinning, it will drive right off the edge. This happens more often than you would think.
Common Issues and Fixes
Here are the problems you are most likely to run into, along with solutions:
The Robot Drives Backward
Your motor direction is reversed. In the Devices panel, swap the direction setting for your motors. Or in Python, flip the True/False value in the Motor constructor:
The Robot Curves Instead of Driving Straight
A few things can cause this:
- Motor ports are swapped: Make sure the left motor is actually on the left and right is on the right
- Wheel friction: One wheel might have more resistance than the other. Check that nothing is rubbing
- Uneven weight distribution: If the robot is heavier on one side, it will pull in that direction
Turns Are Not Accurate (Too Much or Too Little)
- Track width is wrong: Re-measure the distance between your wheel centers and update the drivetrain configuration
- Wheel slippage: The wheels might be slipping on the surface. Try slower turn speeds
- Use the inertial sensor: If you have an inertial sensor, let the drivetrain use it for turns — it is much more accurate than encoder-based turning. We will cover this in a later tutorial.
The Program Does Not Download
- Make sure the Brain is turned on
- Try a different USB cable — some cables are charge-only and do not carry data
- Restart both VEXcode and the Brain
- Check that your firmware is up to date
Competition Tip: Test on the Actual Surface
This is one of the most important pieces of advice we can give you: always test your autonomous on the actual competition field surface.
Your robot will behave differently on carpet versus tile versus foam mats. A program that works perfectly on your kitchen floor might overshoot every turn on the competition field.
At our first competition, we practiced on smooth tile at home. The competition field had foam tiles. Our robot was sliding on every turn and missing every target. Now we always bring a couple of competition-style foam tiles to practice on, or we get to the venue early and test on the real field.
If you cannot get foam tiles, at least test on a surface with similar friction. A carpet or a rubber mat is closer to competition conditions than a smooth hard floor.
Challenge: Drive in a Square
Ready to test your skills? Here is a challenge: make your robot drive in a perfect square.
A square means:
- Drive forward
- Turn 90 degrees
- Drive forward
- Turn 90 degrees
- Drive forward
- Turn 90 degrees
- Drive forward
- Turn 90 degrees
The robot should end up right where it started, facing the same direction.
Here is the code to get you started:
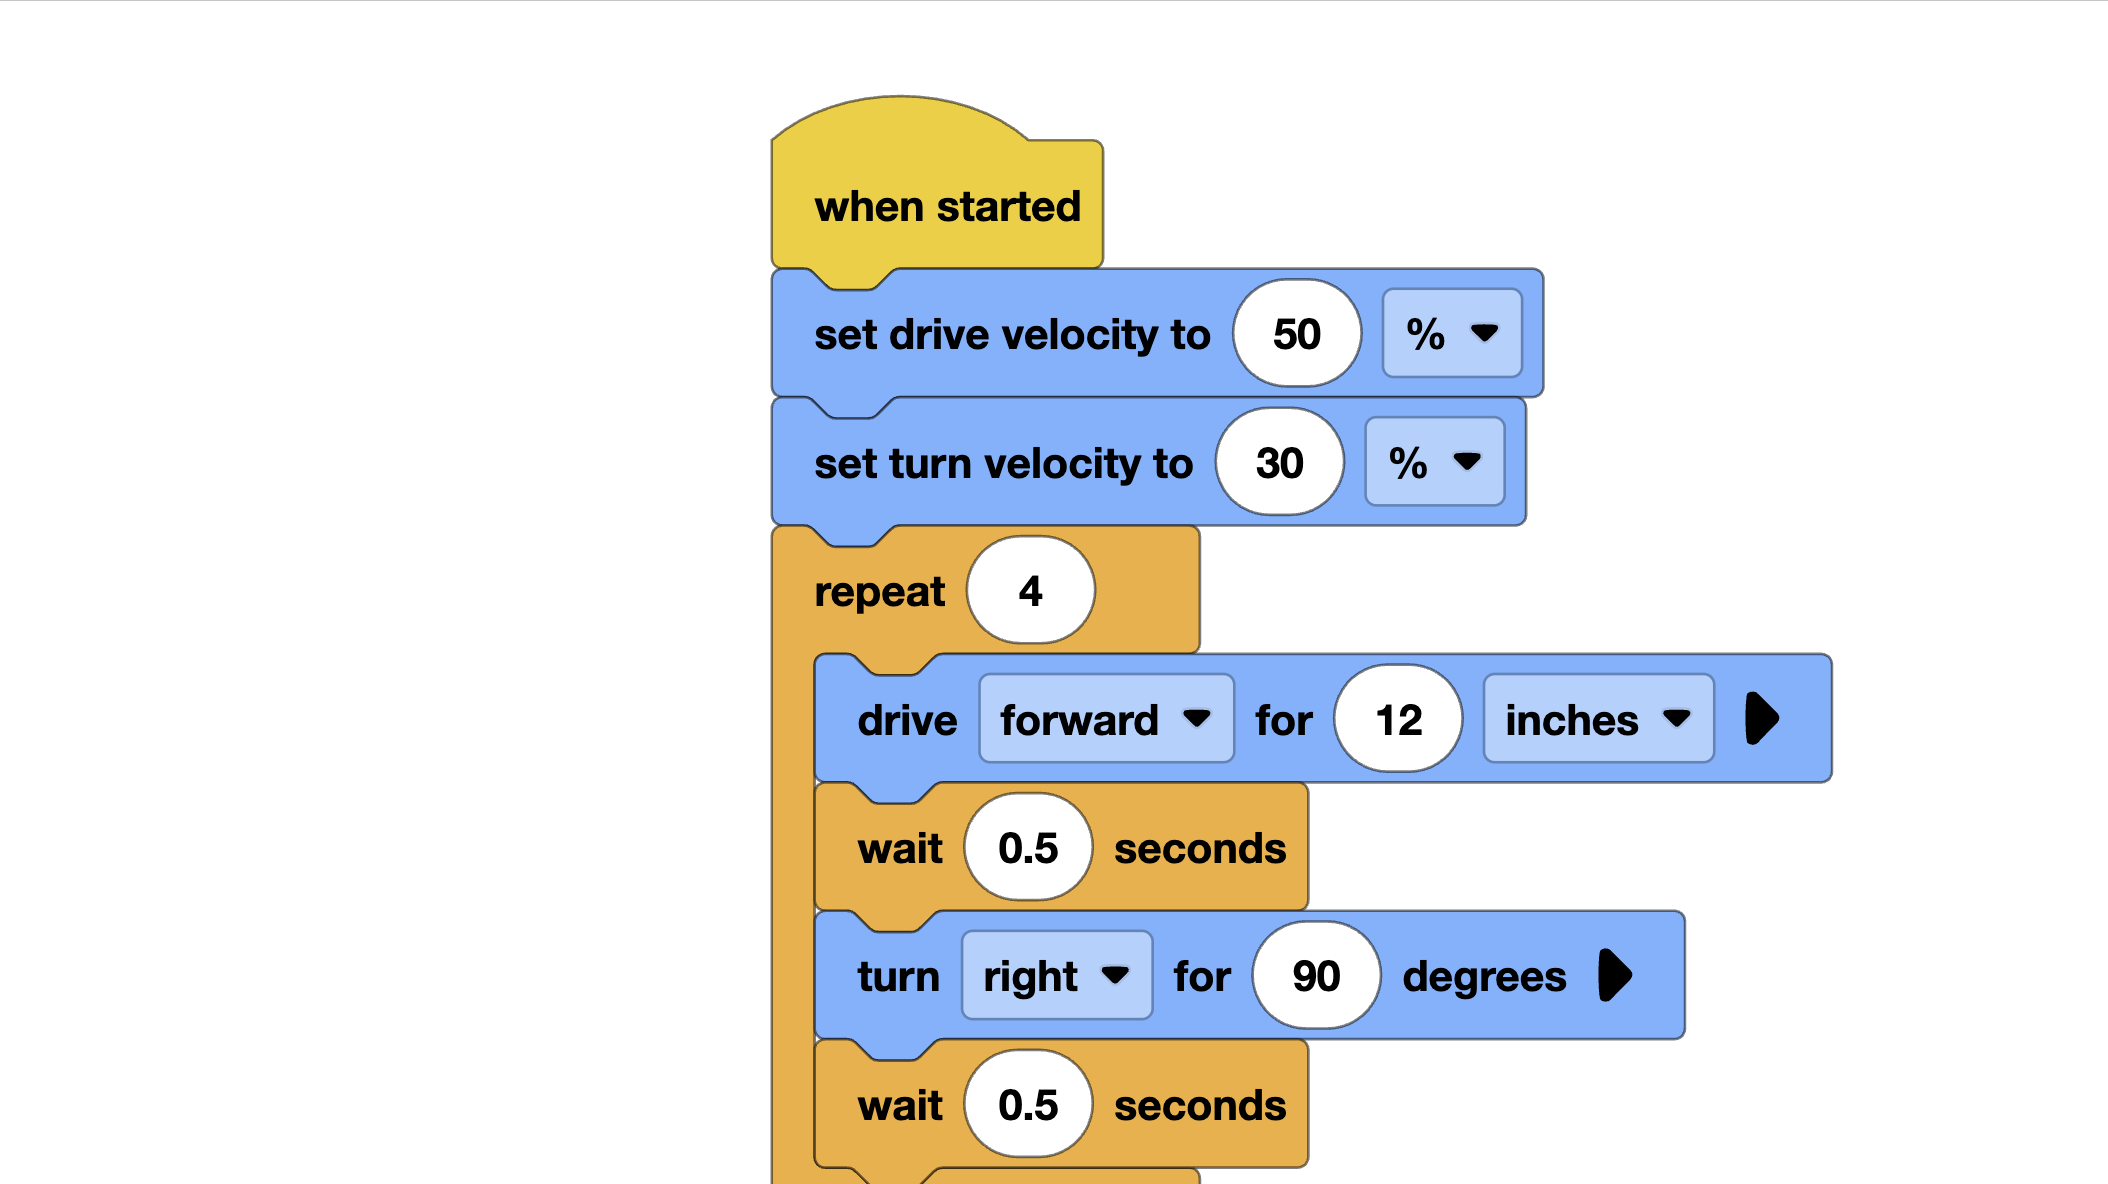
Notice we used a for loop to repeat the drive-and-turn sequence four times. This is cleaner than writing the same two commands eight times, and it is a good habit to get into.
How to Test It
- Place a small piece of tape on the floor where your robot starts
- Mark the direction the robot is facing
- Run the program
- See how close the robot ends up to the tape
If the robot ends up exactly where it started — congratulations, your drivetrain configuration is dialed in. If it is off, here is what to adjust:
- Robot ends up ahead or behind the start: Your wheel size setting is slightly off
- Robot ends up to the left or right: Your track width setting is slightly off
- Robot is facing a different direction: Your turns are not accurate — try adjusting the track width or slowing down the turn speed
This square test is something we do before every competition. It is a fast way to verify that everything is working correctly.
What You Have Learned
Let us recap what you accomplished in this tutorial:
- Configured a drivetrain with the correct motor ports, wheel size, and track width
- Wrote a program that drives the robot forward a set distance
- Added turns to navigate the robot
- Controlled speed for better accuracy
- Downloaded and ran the program on your robot
- Debugged common issues like reversed motors and inaccurate turns
This is the foundation. Every autonomous routine — no matter how complex — is built from drives, turns, and the timing between them.
What’s Next
Now that your robot can drive and turn, it is time to make it smarter. In the next section, we will add sensors to your autonomous programs so your robot can react to the world around it instead of just following blind commands.
The difference between a good autonomous and a great one? Sensors. Let us go.